
How to Mount an Undermount Sink to Quartz

To understand how to mount undermount sink to quartz, start with a professionally cut opening, then clean the quartz underside and sink flange with denatured alcohol. Apply a continuous bead of 100% silicone to the sink’s top flange, lift and align the sink from below, and secure it with the sink manufacturer’s specified clips or a sink rail system. Tighten clips only enough to hold the sink snug, since excess upward pressure can stress quartz.
Heavy cast-iron or large composite sinks need a cabinet-mounted wood frame or manufactured rail that carries the sink, water, disposer and dishes rather than loading the quartz lip and adhesive. Check that the bowl is level, seal the top seam with clear silicone, and allow at least 24 hours, or the adhesive manufacturer’s recommended period, before connecting plumbing or using the sink.
How to Mount an Undermount Sink to Quartz
Using the sealant method described above, hold the sink snug with the sink manufacturer’s specified clips or a rail support system. After the professionally made cutout is ready, the flange must contact a clean underside of the countertop across its full perimeter.
Preparation begins by reviewing the sink manufacturer’s mounting instructions, because the clip style and installation method determine the hardware used. Before applying sealant, clean both the underside of the quartz around the opening and the sink’s top flange thoroughly with denatured alcohol and clean rags. Painter’s tape can mark clean sealant lines on the sink and countertop. Gather a caulking gun, mounting clips or a sink rail system, a drill and appropriate bits, plus a level.
Avoid intermittent spots. That bead is the stated quartz method for the sink-to-counter connection, while clip bases or studs may use the adhesive specified by their installation method. Keep the bead unbroken so the flange can make full contact when raised.
Mounting Sequence
Follow this sequence once the cutout and sink position have been finalized:
- Clean the quartz underside and flange again with denatured alcohol, then let both surfaces dry.
- Apply the sealant to the flange.
- Raise the sink into the cutout from below, align it, and press it firmly upward.
- Fasten the mounting clips under the sink manufacturer’s instructions, tightening only enough to hold the sink snug.
- Alternate tightening clip nuts from side to side when that hardware is used, which helps maintain the sink’s balance.
Home Depot’s clip layout uses one at each corner and additional clips at 10-inch intervals along the sides, while RONA’s glue-on-base method uses two clips per side, spaced 10 inches apart and 1/4 inch from the sink edge.
Follow the applicable hardware instructions for clip attachment, including the required adhesive and its drying period. Once the mount is secure, the sink is ready for the final alignment, top-seam sealing, and curing steps described above before plumbing is connected or the bowl is used.
Plan the Cutout, Reveal, and Cabinet Space
Before the quartz cutout is made, give the fabricator the exact sink template and confirm the sink’s outer dimensions, including the lip or flange that will contact the underside of the countertop. Decide the reveal and final sink location with the fabricator before cutting begins, then confirm that the slab will be reinforced around the opening.
Match the Cutout to the Sink
Templates supplied by the sink manufacturer help the fabricator cut the opening precisely, but the template should be paired with a check of the actual sink dimensions. Measure all outer edges and the flange rather than relying on bowl dimensions alone, because the flange is the surface beneath the quartz.
Choose among a zero reveal, where the counter is flush with the sink walls, a positive reveal with some sink rim visible, or a negative reveal where the counter extends over the sink wall. RONA specifies a 1/8-inch (3 mm) positive or negative reveal, while its zero reveal sits flush with the sink walls.
Cabinet planning needs to account for the bowl, faucet connections and any disposal unit before the sink’s position is finalized. Confirm that the selected sink’s depth will fit the cabinet as well as the planned plumbing and disposal arrangement.
Quartz cutting and polishing merit professional handling: Home Depot recommends considering a professional because quartz and granite are difficult to cut, and RONA directs homeowners to have the counter and faucet openings professionally cut from the sink template. Ask the fabricator to prepare and polish the cutout, and settle the sink, reveal, faucet-opening, and reinforcement decisions before the countertop is secured to the base cabinets.
Early coordination matters because Home Depot says installing the sink is easier before the countertop is attached to the cabinets, while RONA’s method likewise installs the sink before securing the counter. Final confirmation of these points gives the fabricator the information needed to form an opening that matches the sink and the intended installation.
Best Adhesive for an Undermount Sink
For the sink flange, use 100% silicone before raising the sink into place. QuartzCraft specifies 100% silicone for the sink-to-counter bond and warns that other adhesives may not bond correctly or could damage the quartz resin. Silicone also forms the waterproof seal at the joint between the sink and countertop.

100% silicone sealants create flexible, waterproof joints around kitchen sinks, countertops, and backsplashes. They are commonly supplied in cartridges or squeeze tubes, with clear, white, and color matched options. Compare curing time, mildew resistance, indoor use labeling, and compatibility with quartz, metal, and other sink materials.
As an Amazon Associate we earn from qualifying purchases.
Mounting hardware uses a separate attachment method from the flange seal. Home Depot’s approach glues clip studs to the underside of the counter with construction adhesive, then places clips at the corners and at 10-inch intervals along the sides. RONA’s solid-surface method uses epoxy beneath clip bases. Avoid excessive upward pressure against the quartz.
Flange Sealant and Clip Adhesive Serve Different Jobs
Unlike the silicone bead on the sink flange, adhesive at the clips or clip studs secures the mounting hardware to the counter. Ruvati recommends specialized epoxy adhesive for quartz, including at mounting-clip areas. Because the guidance differs by mounting method, use the sink manufacturer’s instructions for the clips and the adhesive manufacturer’s instructions for its cure requirements. Manufacturer-specified clips or a sink rail system provide the mechanical hold while silicone seals the sink-to-counter connection.
| Installation Element | Adhesive or Hardware Method | Key Detail |
|---|---|---|
| Sink flange | 100% silicone | Apply a continuous bead across the entire top flange. |
| Metal clips | Manufacturer-specified mounting clips | Tighten only enough to hold the sink snugly. |
| Clip studs | Construction adhesive | Home Depot places clips at corners and every 10 inches along the sides. |
| Clip bases | Epoxy | RONA uses two clips per side, 10 inches apart. |
| Heavy sink support | Wood frame or manufactured sink rail | The support carries the weight of the sink and its contents. |
Heavy cast-iron or large composite sinks need more than adhesive and clips. Rather than treating clips as the primary weight-bearing system, use them to secure alignment while the frame or rail provides secondary support.
After the sink is seated, run a thin bead of clear silicone along the seam from above and smooth it into a concave fillet with a soapy-water-dampened finger. Allow the silicone to set before connecting plumbing or using the sink. Before the seal has cured, do not put pressure on the sink rim. Once cured, wipe away any accessible excess sealant and check the seam periodically for signs that it needs re-caulking.
Undermount Sink Support Brackets and Rails
Heavy undermount sinks need more than mounting clips: add a cabinet-mounted wood frame or manufactured sink rail when the sink is cast iron or a large composite model. That secondary support must carry the sink, water, dishes, and any waste disposer, rather than leaving the adhesive and quartz lip to bear the load.
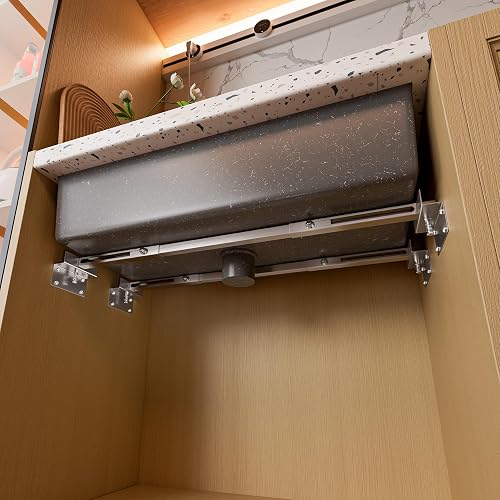
Undermount sink support rails are metal brackets or rail systems that help hold a sink beneath a quartz or stone countertop during installation. Compare adjustable and fixed designs, steel or aluminum construction, rail length, load capacity, mounting method, and compatibility with cabinet dimensions and sink size.
As an Amazon Associate we earn from qualifying purchases.
Choose the support system before final installation, since the cabinet must accommodate it as well as the bowl and plumbing. A properly sized frame sits inside the cabinet and transfers the loaded sink’s weight into the cabinet structure. Manufactured rails serve the same purpose when installed as the rail maker directs. RONA says a wood support frame is optional for all sinks, but its frame and fasteners must be able to support 300 pounds, including the sink, water, waste disposer, and dishes.
Mounting clips still have a role in undermount sink installation on quartz: follow the sink manufacturer’s instructions and tighten them only enough to hold the sink snug.
For glue-on clip systems, follow the previously described layout. RONA’s method uses the previously described placement.
During setup, use a level from inside the cabinet to confirm that the bowl sits flat before finalizing the installation. Shims and 2-by-4-inch boards can act as a temporary stand while raising the sink to the counter, as described by Home Depot. Once the sink is held in its final position, the permanent frame or rail should remain responsible for the loaded weight. An inadequate support system can let a sink sag and may create stress cracks in quartz over time.
Cabinet-side support can be adapted to the available structure. Users on Reddit report a silicone-edge installation secured with a strap screwed into cabinet sides; commenters in that thread said supplied clips were intended for wood countertops. Match support hardware to the sink and its manufacturer’s directions.
Seal, Align, and Cure the Sink
Mount the sink level and seal every point where its rim meets the quartz. Allow the silicone to cure before connecting plumbing or using the sink.
Once the sink is held in its final position, check it from inside the cabinet with a level to confirm that it sits flat. From above the countertop, seal the seam between the quartz and the sink bowl. Smooth the bead with a finger dampened in soapy water, creating a concave fillet that closes the joint without leaving a bulky line.
Before the silicone begins to set, wipe away excess with a clean rag. Any gaps or poorly finished areas in the top seam can let water work beneath the countertop and damage the cabinet below. Careful cleanup also leaves the undermount sink installation on quartz looking finished from above, where the countertop edge and sink opening remain visible.
Home Depot also calls for a 24-hour drying period for caulk, unless the manufacturer’s instructions specify otherwise. RONA’s solid-surface method allows the countertop to be turned over and set on the cabinets after 1 hour, but still requires a 24-hour wait before the sink is used.
After the sink is in service, check the plumbing connections and the seal for leaks. Ruvati advises drying the sink and surrounding area after use, then inspecting and re-caulking the sink-to-counter seal annually.
Can You Replace an Undermount Sink?
An existing undermount sink can be replaced if its dimensions, rim coverage, depth, and cabinet clearance suit the current quartz opening. Fit should be checked before removal, since a replacement that is deeper or differently shaped may conflict with the cabinet, faucet connections, or a disposal unit.
Measure the Existing Sink and Opening
Before buying a replacement, measure all four sides across the existing sink’s rim or lip, then record its outside length, outside width, and depth from the top rim to the underside. Include the flange dimensions because the new sink’s lip must contact enough of the quartz underside to mount securely. Also check the cabinet base for clearance beneath the bowl, around water connections, and around any garbage disposal.
Removal begins by shutting off the main water supply under the sink or the hot and cold shut-off valves. Next disconnect the drainpipe and remove the pipe segment between the strainer and P-trap, disconnecting a garbage disposal before reinstalling the sink when one is present. Carefully cut through the old silicone between the sink rim and the countertop cutout with a utility knife, then remove the old brackets or metal mounting clips. Adhesive remover and a scraper can clear remaining silicone and epoxy from the sink and quartz.
Check the Replacement Before Mounting
Compare the new sink’s outside dimensions, rim or lip, and depth against the old sink and the quartz cutout before committing to installation. Confirm that the flange will cover the opening appropriately and that a deeper bowl will still fit inside the cabinet.
Gently separating the old sink with a pry bar or putty knife can help release it after the mounting hardware and silicone have been removed, while careful lowering helps protect the countertop. Finally, clean adhesive from both surfaces before mounting the replacement sink with the hardware and support arrangement specified for that sink.
Check Plumbing and Maintain the Seal
After installation, inspect every plumbing connection and the sink-to-counter seal for leaks, then keep the seam dry and re-caulk it annually. Regular checks catch water escaping through a plumbing joint or a poor top seam before it damages the cabinet below.
Dry the bowl and surrounding area after use so moisture is not left around the seam. Pay particular attention to the full joint where the quartz meets the sink bowl, since that seam is intended to keep water from seeping beneath the countertop.
Leaks at plumbing connections call for a careful inspection of the connections after installation, rather than assuming the visible countertop seam is the only place water can escape. Use a clean, dry area as the baseline for spotting fresh moisture during later checks.
Annual inspection should include the entire sink-to-counter seal, with attention to any break or opening along the joint. Re-caulk the seam each year as part of routine upkeep, after checking it for leaks. Maintain the joint as part of routine upkeep.
Careful routine maintenance supports the work performed during undermount sink installation on quartz: a sound, continuous seal helps keep water out of the space below the counter. Finally, keep monitoring both the plumbing and seam after routine use, and dry the sink and surrounding area after use.
Where a leak or failing seam is found, address the affected connection or re-caulk the sink-to-counter joint rather than continuing to expose the cabinet to water. Prompt attention helps limit additional water exposure beneath the countertop during routine kitchen use. That routine protects the cabinet space immediately beneath the sink.
Frequently Asked Questions
What Is the Best Adhesive for an Undermount Sink on Quartz?
Use a continuous bead of 100% silicone on the sink’s top flange when mounting it to quartz. Clean both the underside of the quartz and the sink flange with denatured alcohol first. Follow the sink, clip, and adhesive manufacturers’ instructions for the specific mounting hardware, since clip bases may use a different adhesive.
Do Undermount Sinks Need Support Brackets?
Mounting clips or a sink rail system secure the sink against the countertop, following the sink manufacturer’s directions. Heavy sinks need secondary support, such as a wood frame inside the cabinet or a manufactured sink rail. That support should carry the sink, water, dishes, and disposal load rather than leaving it on the adhesive and quartz lip.
How Long Should Sink Adhesive Cure Before Using the Sink?
Allow the silicone to set for at least 24 hours, or for the period recommended by the adhesive manufacturer, before connecting plumbing or using the sink. Avoid putting pressure on the sink rim during that time. RONA also calls for a 24-hour wait before sink use.
Can a Heavy Undermount Sink Rely on Silicone Alone?
A heavy sink, including a cast-iron or large composite model, needs more than silicone and the quartz lip. Install a wood support frame or manufactured sink rail that carries the weight of the sink and its contents. Without adequate support, the sink can sag and create stress cracks in the quartz over time.
Can You Replace an Undermount Sink Without Changing the Quartz Cutout?
Replacement fit depends on the new sink’s rim, outside dimensions, depth, and cabinet clearance. Measure all four sides across the existing sink’s rim or lip, along with its outside length, width, and depth. A deeper replacement must also fit beneath the countertop with room for faucet connections and any disposal unit.
Successful undermount sink mounting starts before installation, with a precise professional cutout, the correct reveal, and enough cabinet clearance. Complete the mounting steps as specified, without overtightening against quartz. Give the sealant at least 24 hours to cure, then check the plumbing and perimeter seal for leaks. Heavy sinks need a frame or rail that carries their full load.
References
- Reddit – The heart of the internet, Reddit, reddit.com
- Undermount Sink Installation with Quartz Countertops | QuartzCrafts, QuartzCrafts, quartzcrafts.com
- Guide To Install Undermount Sinks: A Guide for Home Renovators, Ruvati, ruvati.com
- How to Install or Replace an Undermount Sink, The Home Depot, homedepot.com
- Install an undermount sink in a solid-surface countertop, RONA, rona.ca
Sources read in September 2026.